NEOTT - Section Setting Guidelines:
- A Basic Guide to Consistent Section Setting. This document is based on guidelines from the Utah Trials club and modified to be NEOTT specific. NEOTT's own Jon Stoodley provided input to the Utah Club's guidelines so you know they are well thought out.
- The #1 reason why a new rider doesn’t come back after riding an event, or why long time club members quit coming to the events is because the sections are too hard or dangerous. Club level sections should be fun. They don’t have to be killer.
- After polling riders and Trials Marshals from all across the country, we have come up with this guide to help Trials Marshals set consistently fun, challenging, non-lethal sections…with the emphasis on FUN.
The Loop:
- The loop is not a section. It’s okay to make it a fun trail ride, but ensure that it is easily rideable by ALL classes. The exception can be 2-day events where the PM classes have a separate loop. It should also be easily rideable by spectator riders who may be riding enduro type bikes.
- Ideally the loop should go from the end of one section to the beginning of the next, with an easily ridden trail around each section.
- Allow plenty of staging parking at the beginning of each section so that the section start gate is not blocked.
The Sections:
- Ideally there should be (8), but no more than (10) sections per loop.
- Sections should have a smooth "flow" from the start gate to the end gate and make clear sense. Try to avoid too many obtuse splits in a section.
- A section should have at least (2), but no more than (3) obstacles for each class. More than 3 obstacles and the sections get too long. Instead of having 5 obstacles in a section, split the section into 2 sections.
- A section should always be at least (3) feet wide at all points.
- Section boundaries should be natural boundaries wherever possible. The perfect section would need only the start, and end gates marked, with the intended line defined by trees, rocks, rivers or other natural boundaries. This is, of course, rarely possible, so ribbon must be used.
- The boundary ribbon should be placed so that it is difficult for an in bounds motorcycle to displace it. Try to not attach ribbons or split markers to objects that can be easily displaced such as small rocks. Place the ribbons as low as possible so they cannot be snagged by the bike or rider.
- Sections should be designed so that they can be easily observed and scored, preferably by a single observer/scorer, and so that the observer/scorer can be located near the end gate of the section allowing that riders to quickly present themselves to the observer to have their card punched.
Difficulty:
- If you think a Section may be too hard…it is! Err on the side of easy…not hard!
- Section difficulty should be aimed at the riders who routinely finish in the MIDDLE of the class. Not the top riders in the class. This will give the class a decent challenge and keep it fun. Those at the bottom of the class will have something to practice for, but the event will not be so difficult or dangerous as to scare them away. If those at the top of the class decide they need more challenge, they can and should move up to the next class. After all this is why we have classes. The sections should not be expected to get harder to keep the best rider of each class challenged. A rider should be expected to move up through the classes to get the challenge they need.
- This is NOT National competition. A "club" Trial should be inclusive, fun and a good time to learn. Ideally the winner of each class should “win” with (5) to (10) points. The goal here is (1) point per section for a mid-class rider. This puts the middle of the class in the (20) to (25) point range (1 point per section) and the bottom of the class in the (40) to (50) point range for the whole meet. If those at the top of the class find the sections too easy they will be more likely to move up a class if they are winning with 10 points than if they are winning with 35 points. However, if the class winner is winning with 35 points, he will never move up, and the bottom of the class may have 85 points. That is never fun, and indicates the sections are too hard or dangerous, both of which will cause riders to quit coming.
- If possible, Trials Marshals should be riders who are Intermediate class riders and above. Ideally there should be one lower class and one upper class Marshal for each meet. CAUTION: Upper class riders tend to forget what it was like to ride the lower class sections.
- A Trials Marshal should test ride all of the sections he sets, from his own class down, to ensure their readability. A Trials Marshal should be able to ride ALL of the sections for the class that he/she normally rides, getting ideally (1) but no more than (2) points per section. If you get a (3), the section is too hard. When test riding a section, you should never get a (5) due to difficultly.
- A Trials Marshal should be able to easily ride the sections for classes below the class he/she normally rides.
- It can be difficult, but not impossible for a Trials Marshal to set sections for the classes above the class that he normally rides. Experience will help, but a Trials Marshal should ride the sections for classes above his level, without necessarily riding the actual obstacles. This can give a good idea as to whether they are rideable.
Hint #1:
- Points are rarely taken on big stuff. Points are more often taken on odd turns and off cambers that require the riders to actually use “technique”. You’d be surprised how often an “Upper” class rider can easily clean a big obstacle, but cannot make a simple full lock turn.
- You can jazz up a section and make it fun by making it more technical rather than thinking the stuff has to be big.
Hint #2:
- An obstacle can be made much more interesting by simply adding a turn. So, obstacles do not have to be big. Include both left and right turns between the obstacles throughout the section, so that the class line is not just one straight path from obstacle to obstacle.
- A good turn can “be” an obstacle. It’s okay to have a turn that requires lower class riders to make a “planned dab” to get through it. It’s okay to clean the debris out of a turn to make it more rideable.
Hint #3:
- Big drop offs or jump offs do not get points.....they only break bikes! Avoid them!!
Hint #4:
- Most riders will usually attempt to ride what is set for them. Few will “Take a 5”, even if they should, which is why they get hurt and quit coming.
Hint #5:
- Riders like choices. Make the section lines wide enough so that there are multiple possible lines that they could try. There are a few riders who like to just play follow the leader all day, but there’s always someone looking for a line that might work better, so give them choices.
Classes and their color codes
N - Novice Class - Purple
- If able, an upper class rider should pre-ride the section sitting down.
- 1st gear, no clutch, no brake.
- NO vertical “up” walls or drop offs higher than ANKLE high (~6")
- Ensure there is adequate room to dab on both sides!
- Allow for 2 bike lengths on the approach and recovery area of an obstacle.
- Obstacles such as rocks and logs should be approached head-on versus at an angle
- The skid plate should never touch when going over an obstacle.
- EASILY CLEAN all sections.
A - Amateur Class - Orange
- Ride sections standing up
- 1st gear, no clutch.
- NO drop offs or vertical “up” walls higher than MID CALF (~13")
- Ensure there are adequate dabs on both sides!
- Allow for at least 1 and 3/4 bike lengths on the approach and recovery area of an obstacle.
- Obstacles such as rocks and logs should be approached head-on versus at an angle.
- Generally the skid plate should not touch an obstacle when going over it at the most the skid plate can graze an obstacle when going over it but if contact is made it should not stop momentum or be angled such that the rider's direction of travel is changed.
S - Senior\Advanced Amateur Class - Green
- 3 or 4 sections of the trial should include a tighter turn, a slightly higher obstacle or slightly shorter approach \ recovery area but no hopping or trick riding required.
- Ride sections standing up
- 1st gear, using the clutch.
- NO drop offs or vertical “up” walls higher than KNEE HIGH (~20")
- Ensure there is adequate dab area on one side!
I - Intermediate - Yellow
- No hopping and trick riding required.
- NO drop offs or vertical “up” walls higher than MID THIGH (~26")
- Allow for at least 1 1/2 bike length on the approach and recovery area of a max obstacle.
- Obstacles such as rocks and logs should be approached at no more than 120 degree angle.
- Generally when going over larger rocks and logs the skid plate can be used as a pivot point to roll over an obstacle. The obstacle should be able to be cleared without holding pressure on the rear wheel to land safely.
X - Senior\Advanced Expert - Blue
- Same as intermediate however 3 or 4 sections of the trial should include one or two Advanced that contain a tighter turn, a slightly higher obstacle or slightly shorter approach \ recovery area.
- Optionally, Advanced Intermediate could ride some of the easier Expert sections.
E - Expert - Red
- Hopping or trick riding encouraged in at least 25% - 50% of sections.
- NO drop offs or vertical “up” walls higher than HIP HIGH (~32").
- Allow 2 bike lengths approach and at least 1 bike length recovery area for a max height obstacle.
- Obstacles such as rocks and logs should be approached at no more than 180 degree angle.
- When going over larger rocks and logs the rider can be required to clear the skid plate over the obstacle by holding pressure on the rear wheel to land safely.
M - Master - Black
- Discretion with respect to safety of bike and rider should be used. Dangerous is never fun. Use common sense, but most of the time you cannot set sections that these guys cannot figure out how to ride.
- If in doubt have some master level riders review the sections prior to the event starting.
The Bottom Line:
At the end of the day, it is way better to hear, “It was a little easy, but it was fun!” Instead of hearing, “This is nuts! What were they thinking?” In the worst case scenario riders are loading up and going home early because the course is set too difficult and dangerous. You will be lucky if they come back ... ever.
Measuring Guidelines:
One way to speed up the section setting process is to know the maximum height obstacles for each class and allow enough approach and recovery space. The heights are measured in inches while the approach and recovery space can be measured in terms of bike length. 80 inches is a good number to use for one bike length since it easy to remember. Some bikes are a little shorter (Beta) some bikes are a little longer (GG).
Bottom line this is an attempt to find a way to set up good sections in a consistent way without just eyeballing something and having it be too loose or worse too tight.
Examples include:
*Note that the max heights are on flat ground without using a kicker or helper of any kind. Also note that the distance is really the distance the rear wheel travels from the take off point to the landing point. The overall obstacle height from the ground could be 70" but if it is sloped and the true takeoff point is at the 50" mark then it is only a 20" obstacle. These are just guidelines to assist in assessing the degree of difficultly of an obstacle and which classes should \ should not attempt it.
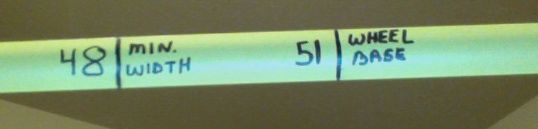
Using this information as a guide you can quickly measure where to place the ribbon without having to pre-ride the section. To that end you can take a 16 foot tape measure and mark the distances on the back using a Sharpie pen that way you have a quick handy reference to measure obstacle height in the field to know where to set the ribbon. Note the large font, easy to read without glasses :-)
The closer an obstacle is to maximum height for the class is then the more approach and recovery space is needed. Example a 32" Expert obstacle would require 1 3/4 to 2 bike lengths to setup but an Expert going over a 12" obstacle could float it from a 3/4 bike length at an angle.
Bottom line this is an attempt to find a way to set up good sections in a consistent way without just eyeballing something and having it be too loose or worse too tight.
Examples include:
- 6" - Max Novice Height Obstacle*
- 12" - Skid Plate Height
- 13" - Max Amateur Height Obstacle*
- 20" - Max Sr. Amateur Height Obstacle*
- 26" - Max Int Height Obstacle*
- 32" - Max Expert Height Obstacle*
- 33" - Handlebar width (check spacing between trees\rocks)
- 40" - 1/2 bike length
- 48" - Minimum width between boundaries
- 51" - Typical wheelbase (space needed on the top of a rock to get both wheels on it)
- 60" - 3/4 bike length
- 80" - 1 bike length
- 100" - 1 and 1/4 bike length
- 120" - 1 and 1/2 bike length
- 140" - 1 and 3/4 bike length
- 160" - 2 bike lengths
*Note that the max heights are on flat ground without using a kicker or helper of any kind. Also note that the distance is really the distance the rear wheel travels from the take off point to the landing point. The overall obstacle height from the ground could be 70" but if it is sloped and the true takeoff point is at the 50" mark then it is only a 20" obstacle. These are just guidelines to assist in assessing the degree of difficultly of an obstacle and which classes should \ should not attempt it.
Using this information as a guide you can quickly measure where to place the ribbon without having to pre-ride the section. To that end you can take a 16 foot tape measure and mark the distances on the back using a Sharpie pen that way you have a quick handy reference to measure obstacle height in the field to know where to set the ribbon. Note the large font, easy to read without glasses :-)
The closer an obstacle is to maximum height for the class is then the more approach and recovery space is needed. Example a 32" Expert obstacle would require 1 3/4 to 2 bike lengths to setup but an Expert going over a 12" obstacle could float it from a 3/4 bike length at an angle.